Important:
- Download the Planning and Preparation Workbook and complete it. ( techdocs.broadcom.com/us/en/vmware-cis/vcf/vcf-9-0-and-later/9-0/planning-and-preparation.html)
- If you have been running Essentials or Essentials Plus, you are at the end of the road.
- If you are on Standard or higher, you have a migration path to VMware Cloud Foundation (VCF) or VMware Foundation (VF). The latter lacks the automation and cloud management capabilities. Note for which you are licensed.
- If you have a limited number of hosts, you can upgrade your hosts using the VCF 9 installer even before the VCSA (vCenter appliance). However, it is more scalable to "upgrade" the LCM, Operations, and Automation, first, then VCSA later, which actually always creates a new vCenter appliance. Afterwards, in the Lifecycle Manager, import the ESXi 9 depot image and deploy to the hosts a group at a time.
- If you do not have LCM and Aria Operations, the VCF installer can deploy one, like it would for a new "greenfield" installation. This is primarily a "converging" upgrade because it assumes VCF was not previously installed.
- See the Broadcom tech doc: techdocs.broadcom.com/us/en/vmware-cis/vcf/vcf-9-0-and-later/9-0/deployment/converging-your-existing-vsphere-infrastructure-to-a-vcf-or-vvf-platform-/supported-scenarios-to-converge-to-vcf/converge-your-existing-vcenter-instance-esx-hosts-vrealize-suite-lifecycle-manager-vmware-aria-operations-and-vmware-aria-automation.html
Other Technical Considerations:
- With VCF 9, there is a VCF Fleet, which contains 1 or more VCF Instances. Each fleet looks like:
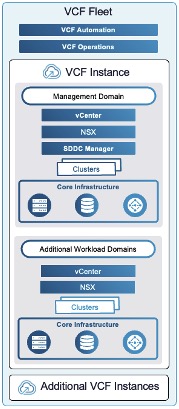
- From an administrative perspective, a VCF fleet contains a VCF Fleet Management. A VCF Fleet Management is a VCF Operation instances managing one or more VCF instances created w/in the fleet. Optionally, a VCF Automation can be deployed with the VCF Operations.
- - Technically, the VCF Operations is now multiple VMs with the Fleet Management actually provided by the Fleet Management Appliance, but its UI is embedded in the VCF Operations, not there.
- Operations for Logs and Network are separate of the main VCF Operations now, and there can be one of each across multiple VCF Instances w/in the VCF Fleet.
- If you have an additional independent Automation installed, it will be independent and not have access to Fleet Management functionality.
- Each VCF Instance is a "management domain", and has its own SDDC Manager, vCenter, NSX, and can have its own Identity Broker (vIDM), and Operations Cloud Proxy (Collector). All VCF instances use the same VCF Operations.
- Scaling and balancing fleets is performed by creating additional VCF Instances, or moving a VCF instance from one Fleet to another one.
Scenario Notes:
- For this set of instructions, we are going to use LCM. LCM can only upgrade vSphere 8 to VCF 9, if Patch 2 is manually installed.
- The Broadcom documentation has been updated (2025/07 and 2025/10) with additional/alternate instructions to deploy the new VCF first, and then converge existing assets using the VCF Installer. If using the VCF installer, this software is installed on a workstation, configured, and it downloads software to the local workstation instead of download from the Broadcom support site.
Prerequisites:
1. Check your ESXi hosts to verify if they are on the hardware compatibility list for VCF 9.0.
2. Confirm good back-ups of the Aria LCM and Operations VMs/instances (Operations != Aria Automation vRA/vRO)
A. Upgrade LCM:
As we are using Aria Lifecycle Manager (LCM), we need it upgrade it to the latest patch (e.g. 8.18 Patch 2)
1. Download Patch 2 from the Broadcom support portal My Downloads.
2. Manually upload to the LCM appliance via SCP or Filezilla to the /root/data location.
(Verify you have enough disk space!)
3. Map the binary:
a. Browser --> LCM --> login --> Lifecycle Operations --> Settings --> Under Servers & Accounts --> Binary Mapping
b. On the Binary Mapping page, click ADD BINARIES (button) -->
- Location Type: Local (in appliance)
- Base Location: /data
- Click DISCOVER (button)
- Click the checkbox next to the transferred software discovered
- Click ADD (button)
c. Perform Snapshot (required):
- LCM --> Lifecycle Operations --> Settings --> System Patches --> click Create Snapshot (button)
- <wait>
4. Apply the patch, which at the end the appliance will reboot.
a. Apply the patch:
- LCM --> Lifecycle Operations --> Settings --> System Patches --> click New Patch (button)
- Select the VMware Aria Lifecycle 8.18 2 (Patch 2) or later, click Next (button)
- On the Review installation summary page, review and click Install (button).
b. Monitor and wait for reboot
5. After reboot, verify the version and that patch 2 is listed (e.g. 8.18 Patch 2).
- LCM --> Lifecycle Operations --> Settings --> System Details, verify the Patch version shows Patch 2 or later
- LCM --> Lifecycle Operations --> Settings --> System Patches, verify the Product Patch Level shows Patch 2 or later
B. Upgrade Aria Operations:
Notes:
- If LCM is not installed, Aria Operations can be self upgraded by downloading the latest software update, shutting it down, creating a cold snapshot manually, starting it back up, and uploading the new update via its console.
- For the VCF Operations Fleet Management VM, verify the DNS and reverse IP lookup are working. verify you have the password (15 chars min.) for root, and another form admin@local
- If Aria Operations is not installed in the vSphere 8.x environment, it must be installed as it is a required VCF/VF component.
- The instructions below, assume the use of LCM.
1. Download from the Broadcom support portal:
a. Aria Operations 9.0 upgrade package
b. Fleet Management OVA template
e.g.
OVA file: VCF-OPS-Lifecycle-Manager-Appliance-9.0.0.X.XXXXXXX.ova
PAK file: Operations-Upgrade-9.0.0.X.XXXXXXXX.pak
2. Manually upload to the LCM appliance via SCP or Filezilla to the /root/data location.
(Verify you have enough disk space!)
3. Map the binaries:
a. Browser --> LCM --> login --> Lifecycle Operations --> Settings --> Under Servers & Accounts --> Binary Mapping --> Product Binaries
b. On the Binary Mapping page, click ADD BINARIES (button) -->
- Location Type: Local (in appliance)
- Base Location: /data
- Click DISCOVER (button)
- Click the checkbox next to both the OVA and the PAK transferred files discovered
- Click ADD (button)
4. Upgrade:
a. Switch to the Operations environment and start upgrade:
- LCM --> Environments --> Aria Operations (chiclet/box) --> View Details (button) --> Upgrade (button)
b. At the Proceed Upgrade page, read the recommendation and perform sync:
- Click Trigger Inventory Sync --> click Submit (button)
c. Wait for the sync.
d. Click Upgrade (button) again (back to step 4a. above), click Proceed (button)
e. At the Product Version and Repository URLs page, click Next (button).
f. At the VCF License type page, choose:
Note: VCF includes the Fleet Management appliance (VM) and upgrades Aria Operations, VF/VVF only upgrades Aria Operations.
- Set the correct license type: VCF or VF (VVF).
- Click Run Assessment (button)
g. At the Pre-upgrade Assessment, page:
- Review check results. If you have failed pre-checks, do NOT proceed. You must remediate all of them.
- click Take product snapshot (button - optional, but wise in case the upgrade fails)
h. If the VCF license was chosen, enter the Fleet Management appliance info:
- vCenter server: <select VCSA>
- Cluster: <select cluster location>
- Folder: <select folder>
- Resource pool: <select pool>
- Network: <select mgmt network>
- Datastore: <select datastore location>
- Disk Mode: <select>
- VM Name: <enter name, e.g. OPS Fleet Management>
- FQDN: <enter FQDN>
- IP Address: <enter IP>
- Admin Password: <enter pwd> (admin@local)
- Root Password: <enter pwd>
- Network Details:
- - Domain Name: <enter top level> (e.g. mindwatering.net)
- - Domain Search Path: <enter top level domain> (e.g. mindwatering.net)
- - DNS Servers: click Edit Server Selection (button) --> Add New Server (button) <enter server ip>
- - NTP: click Edit Server Selection (button) --> Add New Server (button) <enter server ip>
- - IPv4 Details:
- - - IPv4 gateway: <enter ip>
- - - IPv4 netmask: <enter mask>
- Click Run Precheck (button)
- - Review summary and validate
- Click Submit (button)
i. Monitor workflow on the Requests page (left menu - should automatically switch when kicked off)
- Aria Operations is shutdown and deregistered from LCM.
- New appliance created and added to LCM
5. Confirm Aria Operations upgrade:
- Previous Aria Operations VM/instance shutdown still and deregistered from LCM
- New Aria Operations is 9.0 and registered under/with Fleet Management
Note:
- LCM continues to manage Aria Operations for Logs and VMs in parallel until full environment is VCF 9/VF 9.
C. Upgrade Aria Automation (vRA/vRO):
Notes:
- Automation/vRA is not required component, it can be upgraded later after the VCF stack upgrade.
- Upgrading afterwards is can be preferred for the custom code in use which requires extending testing with VCF 9.
- Ensure that Aria Automation Orchestrator is already 8.18.1 before the VCF 9 upgrade.
- The instructions below, assume upgrade now using the new Operations instance.
1. Add to Operations Fleet Management and upgrade:
a. Browser --> Operations --> login --> Fleet Management (left menu twistie) --> Lifecycle --> VCF Management
b. On the VCF Management page, under Components (tab) --> under automation (heading):
- click Import (radio button) --> Click Next
c. After import, upgrade:
- LCM --> Environments --> Aria Automation (chiclet/box) --> View Details (button) --> Upgrade (button)
1alt. Upgrading the Automation Orchestrator appliance can also be done by mounting a downloaded ISO:
Note:
- For a clustered appliance (of 3 VMs), perform the SSH steps on all 3 nodes.
- Aria Automation authenticates w/vSphere typically with the VCSA SSO user (use either vracli vro authentication command, or look at /data/vco/usr/lib/vco/app-server/conf/sso.properties file).
- If using the upgrade status --follow command, it can output an error if entered so early that not all the pods are running yet.
a. Download from the Broadcom support portal to the local workstation the latest VCF Aria Automation version.
b, In the vSphere client:
- Shutdown the Automation appliance(s), and preform a cold snapshot. (Aria Automation does not support memory hot snapshots.)
- Connect the ISO to the Aria Automation (vRA/vRO) VM CDROM disk
- Start the appliance VM(s)
c. Via SSH, connect to the VM as root:
- Run the blkid command to get the CDROM device id for the next step.
# blkid
<view output>
- Mount the drive:
# mount /dev/<diskid> /mnt/cdrom
- Confirm the SSO user:
# vracli vro authentication
<view user>
- Run the upgrade:
# vracli upgrade exec -y --repo cdrom://
<wait>
- When the appliance reboots part way through the upgrade, ssh back into the VM and monitor the rest of the progress again:
# vracli upgrade status --follow
<watch>
Note:
- If you get the not all pods are running error, wait for them to all be running:
# kubectl get pods -n prelude -w | grep -E 'vco|orchestration-ui'
<confirm all running>
- After all running, we can watch/follow the upgrade again.
D. Upgrade Aria Operations for Networks to VCF Operations for Networks 9:
Notes:
- Ensure the existing Operations for Networks version is 6.13. If not, update it to this version before upgrading.
- This component can be done after the VCF stack upgrade, as well, if preferred.
- The instructions below, assume upgrade now using the new Operations instance.
1. Add to Operations Fleet Management and upgrade:
a. Browser --> Operations --> login --> Fleet Management (left menu twistie) --> Lifecycle --> VCF Management
b. On the VCF Management page, under Components (tab) --> under network (heading):
- click Import from Legacy Environment (radio button) --> Click Next
c. On the Lifecycle Configuration page, enter
- VMware Aria Suite Lifecycle FQDN
- Username
- Admin Password
- Root Password
d. Select the Aria Operations for Networks Platform instance
e. Review selections.
- Confirm legacy vSphere environment is correct
- Confirm FQDN of the neworks instance to be imported into the new Operations instance and upgraded
- Click Submit (button)
2. Upgrade the Network:
- On the Overview tab (appears when done), click Manage (button).
- On the Components page, click Plan Upgrade (button)
3. Confirm release upgrade versions:
- On the Overview tab (appears when done), confirm version upgrade is 6.13.x to VCF 9.0.0.x
- Click Upgrade (button)
3. Perform obligatory sync:
- Click Trigger Inventory Sync (button), click Submit
- <wait>
4. Perform the upgrade:
a. Return to the Overview tab.
b. click Upgrade (button), click Proceed (button).
- <wait>
- Snapshot is taken
c. On the Precheck page, click Run Precheck
- <wait>
d. On the Upgrade Summary page, validate details, click Submit (button)
- <wait>
- The Tasks tab shows the status of the upgrade.
E. Upgrade SDDC Manager
Notes:
- If you already have a SDDC Manager instance, you can upgrade it using the new LCM appliance.
1. Browser --> LCM --> login --> Lifecyle Management (twisite) --> SDDC Manager (left menu option)
2. On the SDDC Manager page, under Available Updates (tab) --> Inside the 9.0.0.x (chiclet box) --> Update Now (button)
a. Run the Precheck, and the Submit.
F. Upgrade NSX:
Notes:
- With the initial VCF 9.0.0.0 release, if the vCenter is using NSX (why would it not), there is a chicken-egg issue: LCM may not be able to upgrade NSX, because the upgraded VCF Operations isn't managing it yet.
- This contradicts the
1. Browser --> LCM --> login --> Inventory (twisite) --> Workload Domains (left menu option) --> select NSX network (e.g. for the main management network: sddc-m01)
2. On the Workload Domain <NSX name> page, click Updates (tab) --> Plan Upgrade (button)
a. Select target version
b. Run the Precheck.
c. Verify no issues.
d. Click Submit (button) to perform upgrade
G. Upgrade VCSA 8 (vCenter) to VCSA 9:
Notes:
- The new "Reduced Downtime Update" is similar to the last ones, where the new appliance is deployed (Task 1) while the current vCenter is up-and-running-still. It's not until the maintenance window (Task 2), that the configuration and logs (if checked/enabled) are copied to the new vCenter appliance.
- Make sure you have CPU memory, and storage resources to handle two VCSA appliances around at the same time.
- If upgrading to VCF 9.0.1, and the vCenter is 8.0.1a or later, and has NSX 4.1.0.2 or later, with registration (usage) with the vCenter, the upgrade can be delayed until the actual VCF Installer run, which will upgrade them.
1. Have backups of the VCSA?
2. Download from the Broadcom support portal, the vSphere installer program/ISO.
3. Run the vCenter Upgrade Wizard, which creates the new VCSA VM instance, and abandons the old one.
H. Upgrade ESXi Hosts:
Notes:
- Upgrade of hosts via the VCSA/vCenter Lifecycle Manager baselines are no longer supported, use the new LCM and SDDC Manager created/upgraded.
- Upgrades are applied to a cluster at-a-time. Each host in the cluster is upgraded one at a time.
- If upgrading to VCF 9.0.1, and the ESXi hosts are 8.0.1a or later, the upgrade can be delayed until the actual VCF Installer run, which will upgrade them.
1. Download the image depot from the Broadcom support site.
2. Using LCM import the ESXi 9.0 image depot (zip) and create the ESX 9 cluster image.
3. Assign the new cluster image to a vSphere cluster.
4. Remediate (upgrade) by initiating compliance and update operations (similar to the vSphere Lifecycle page). Tasks:
a. Place each host into maintenance mode (which evacuates VMs)
b. Install and reboot the ESXi host.
c. Return the host from maintenance mode and back into DRS scheduling (allow VMs to come back when the next host is evacuated).
d. Repeats for all the rest of the cluster hosts sequentially.
I. Deploying the VCF Installer Appliance:
Notes:
- Create a VM in the management network that access access to the vCenter, hosts, and have external access to DNS and NTP.
- - Deploy it to an administrator workstation running Workstation or Fusion, or an independent standalone ESXi - This will allow provision multiple VCF or VF platforms using the VCF Installer appliance
- - Deploy it to an ESXi host w/in the vCenter cluster - This will allow deployment of a single VCF to "this" converged vSphere cluster(s).
- If you deploy the Installer so it is on the management network, you can use it to create multiple VCF instances.
- Use the FQDN and IP, with reverse DNS selected in the planning.
- In this example, we are going to use an ESXi host that is outside the vSphere cluster, but has access/configured for the management network and the management datastores.
- After VCF installer configures the management domain storage, it moves itself to that storage with Storage vMotion and switched to SDDC Manager mode. Any local workstation/ESXi disk remains empty and is not added to the management domain storage.
- The root and admin@local passwords must be 15 characters minimum, with only the @ ! # $ % ? ^ special characters.
1. Download the OVF from the Broadcom support portal.
e.g. SDDC-Manager-Appliance-9.0.0.0.<build_number>.ova
2. Create the appliance:
a. ESXi Host Client --> login --> Host (left navigation menu) --> Create/Register VM (button)
- On the Select OVF and VMDK files page, enter:
- - VM Name
- - Browse to the SDDC ova above.
- Click Next (button)
- On the Select Storage page, select the management datastore desired
- Click Next (button)
- On the License agreement pop-up, click I agree (button), and click Next (button) to proceed
- On the Deployment options dialog, enter:
- - Network Mappings: <select management portgroup>
- - Disk provisioning: Thin
- - Power on automatically: <checked/selected>
- On the Additional settings dialog, expand Application (twistie):
- - Root user password: <enter pwd>
- - Root user password confirm: <enter pwd again>
- - Local user password: <enter pwd> (for the admin@local user)
- - Local user password confirm: <enter pwd again>
- - Host Name: <enter the SDDC Manager hostname selected during planning>
- - NTP Servers: <enter fqdn or IPs separated by commas>
- Still on the Additional settings dialog, expand Networking Configuration (twistie):
- - Network 1 IP Address: <enter IP>
- - Network 1 Subnet Mask: <enter mask>
- - Network Default Gateway: <enter gateway IP>
- - DNS Domain Name: <domain.tld> (e.g. mindwatering.net)
- - Domain Search Path: <search path> (e.g. mindwatering.net)
- - Domain Name Servers: <enter IPs of the primary and secondary DNS separated by commas.> (Enter two, and only two.)
- Click Next
- On the Ready to complete page, review the settings, click Finish (button)
3. Validate the installation:
a. SSH into the VCF Installer appliance using the vcf local user and the local user password.
b. Ping each of the ESXi hosts in the cluster to confirm network connectivity.
c. Ping DNS entries to confirm DNS resolution is working.
d. Ping the NTP server(s) to confirm connectivity.
e. Login to the VCF Installer appliance administrative interface using the admin@local account and the local user password.
J. Downloading Binaries to the VCF Installer:
Notes:
- Requires use of the new Broadcom tokens to access the online VMware repo.
- Alternately, the VMware Cloud Foundation Download Tool, can be installed (Free Downloads) and used to download the installation binaries.
- You do not need to download binaries for components already upgraded. If delaying upgrading components till later, Broadcom still recommends downloading the binaries and having them ready.
- What to download depends on the license choice made previously (VCF or VF/VVF).
- With these instructions, we are going to the online depot within the VCF Installer.
WARNING:
- If the VCF version 4.x still, it must be upgraded to 5.2.x before proceeding with step 4 below.
1. Download the required binaries for your license:
a. VF and VCF common binaries:
- VMware Cloud Foundation Operations
- VMware vCenter
b. If running VCF, also download:
- VMware NSX
- VMware Cloud Foundation Automation
- VMware Cloud Foundation Operations fleet management
- VMware Cloud Foundation Operations collector
- SDDC Manager
2. Login to the VCF Installer:
a. Browser --> VCF Installer --> login w/admin@local --> Depot Settings and Binary Management
b. Click Configure (button)
- Token: <paste customer token>
c. Click Configure (button), again.
3. Download binaries:
- Product: <VMware Cloud Foundation or vSphere Foundation>
- Version: <9.0.0 or 9.0.1>
- Click the checkbox next to the components to download.
4. Deploy the VCF Fleet:
Notes:
- If an Operations instance exists already, you select the VCF Operations above as existing for the new deployment
- If you didn't have an Operations instance, one will be created as part of the installation.
- With these instructions, we are deploying a VCF, not a VF/VVF, and we do not already have a 5.2 VCF instance to re-use.
- If you are deploying a HA production VCF Fleet:
- - Operations will have more than one IP, create and use a VIP/LB and enter that FQDN and primary IP/VIP (step e). Configure all the IPs Operators in the LB behind the VIP.
- - Automations will have 4 IPs, 3 for the active HA nodes, and 1 extra for upgrade rollovers. No DNS forward or reverse records are required.
a. Browser --> VCF Installer --> login w/admin@local --> Deployment Wizard --> Chose license type:
- VMware vSphere Foundation (VF/VVF)
- or -
- VMware Cloud Foundation (VCF)
- Click Next (button)
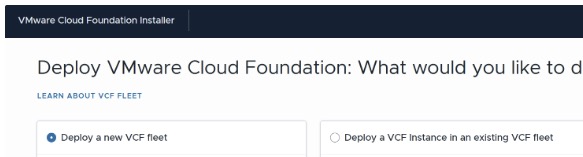
b. Select Deploy a new VCF Fleet:
c. On theExisting Components page:
Note: Select the existing components to be included in the new VCF Fleet.
- VCF Operations: <checked>
- VMware vCenter: <checked>
- NSX Manager: <checked>
- SDDC Manager: <checked> (if already existing)
- VCF Automation: <checked> (if existing, and if performing now)
- Click Next (button)
d. On the General Information page:
- VCF Instance Name: <enter unique name>
- Management Domain Name: <enter domain> (e.g. mindwatering.net)
- Custom networking configuration for VCF Operations and VCF Automation: <skip> (keeping the VCF Operations and Automation in the same distributed virtual port group as the vCenter, not available if re-using existing Operations instance.)
- Deployment model: High Availability (Three-node)
e. On the VCF Operations page:
- Under Fleet Management Appliance:
- - Appliance FQDN: <confirm the FQDN of the Operations instance>
- - Administrator password: <enter pwd>
- Under Operations Collector Appliance:
- - Appliance FQDN: <enter FQDN from planning doc>
- - Administrator Password:
- - Confirm Administrator Password:
_________
previous page
|