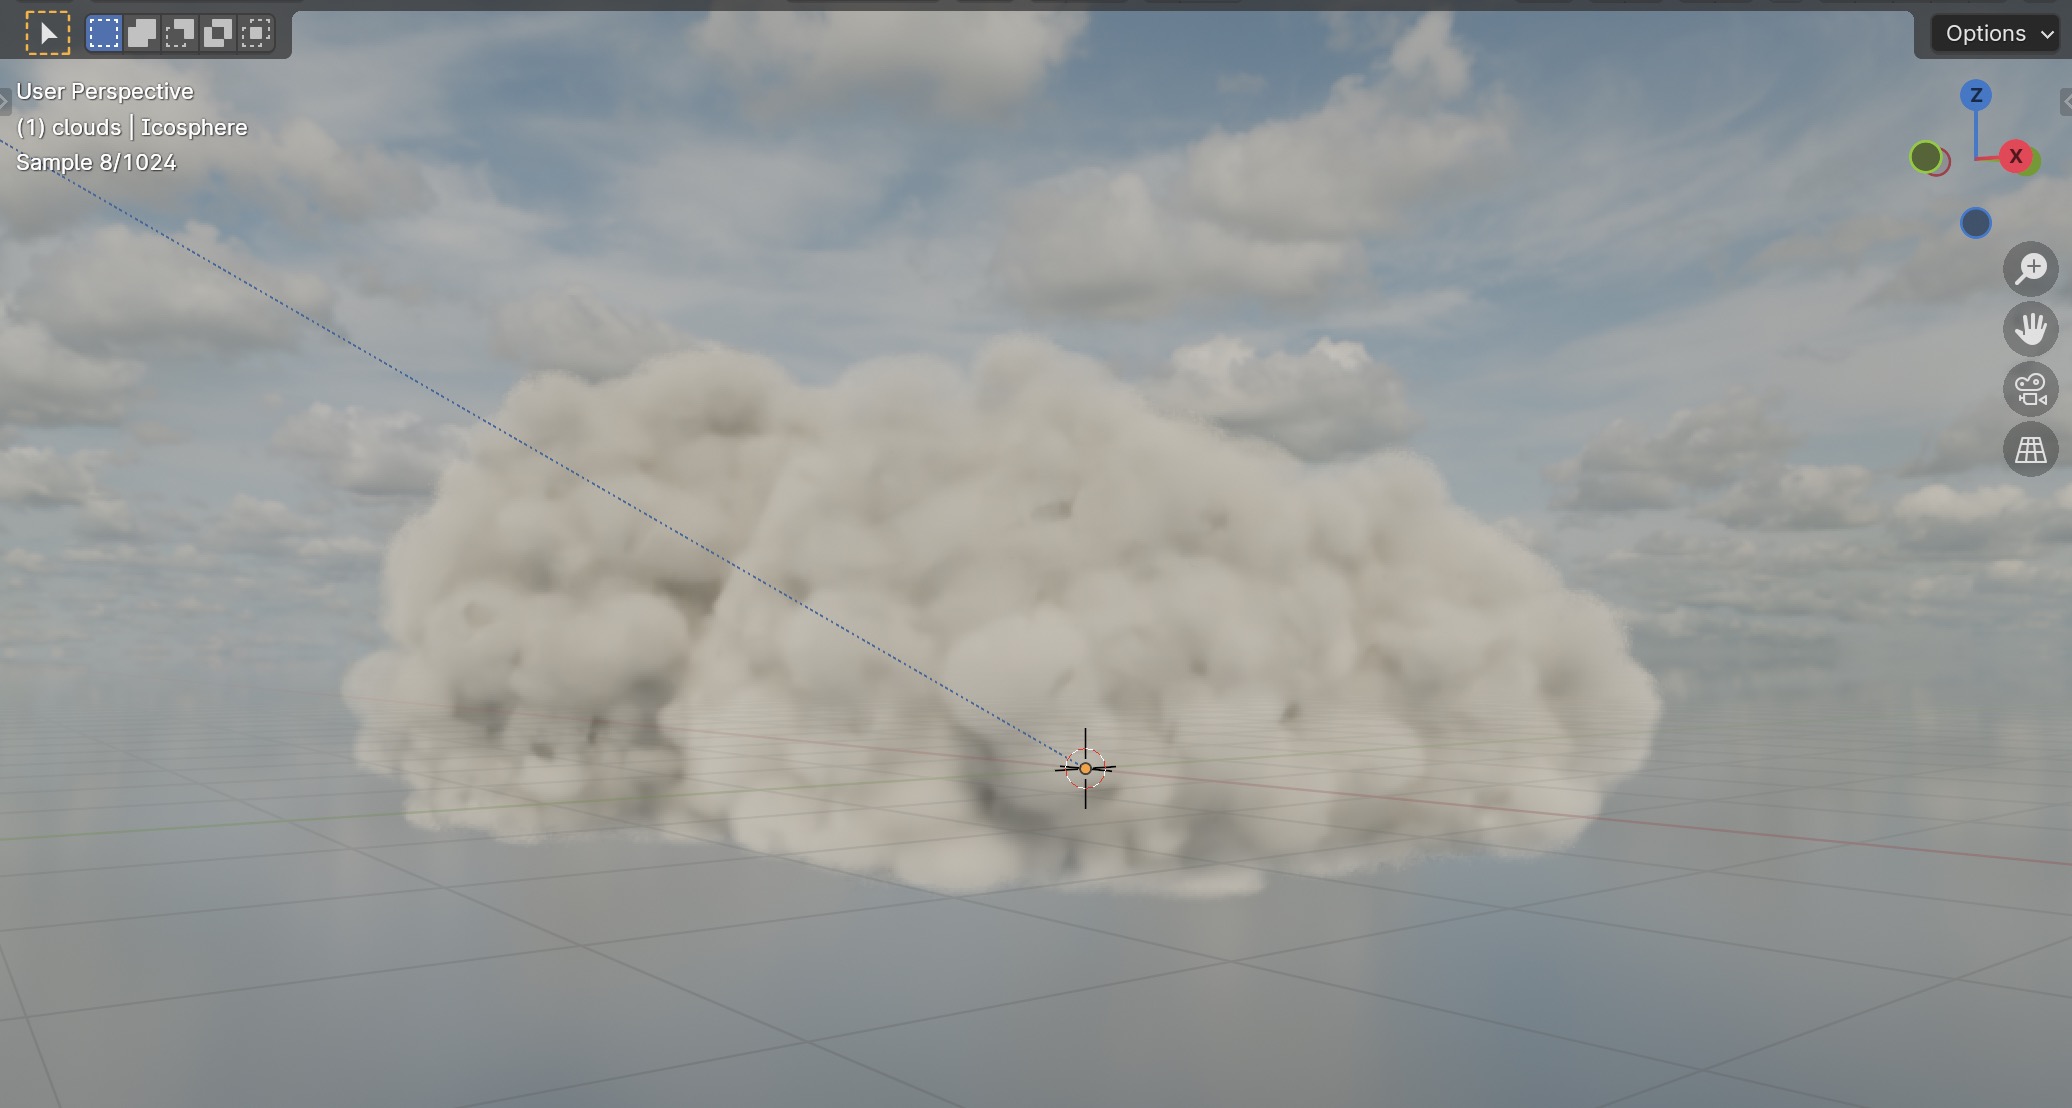
Introduction
Add detailed, easily editable, fast-rendering procedural clouds in Blender Cycles
Blender Version
4.1.1
Prerequisites
A sky texture
A cloud volume material
Save your Blender file often
Steps
In 3D viewport, Shift+A -> Mesh -> Ico Sphere
Drag from corner to open a new viewport
Editor Type dropdown -> change from 3d Viewport to Geometry Node Editor
Shift+A -> Type to search:
- Random Value x3
- Math x3
- Ico Sphere x2
- Points
- Instances on Points x2
- Distribute Points on Faces
- Join Geometry
- Realize Instances
- Separate XYZ x3
- Combine XYZ
- Map Range
- RGB Curves
- Bounding Box
- Position
- Repeat Zone
- Mesh to Volume
- Bake
- Set Material
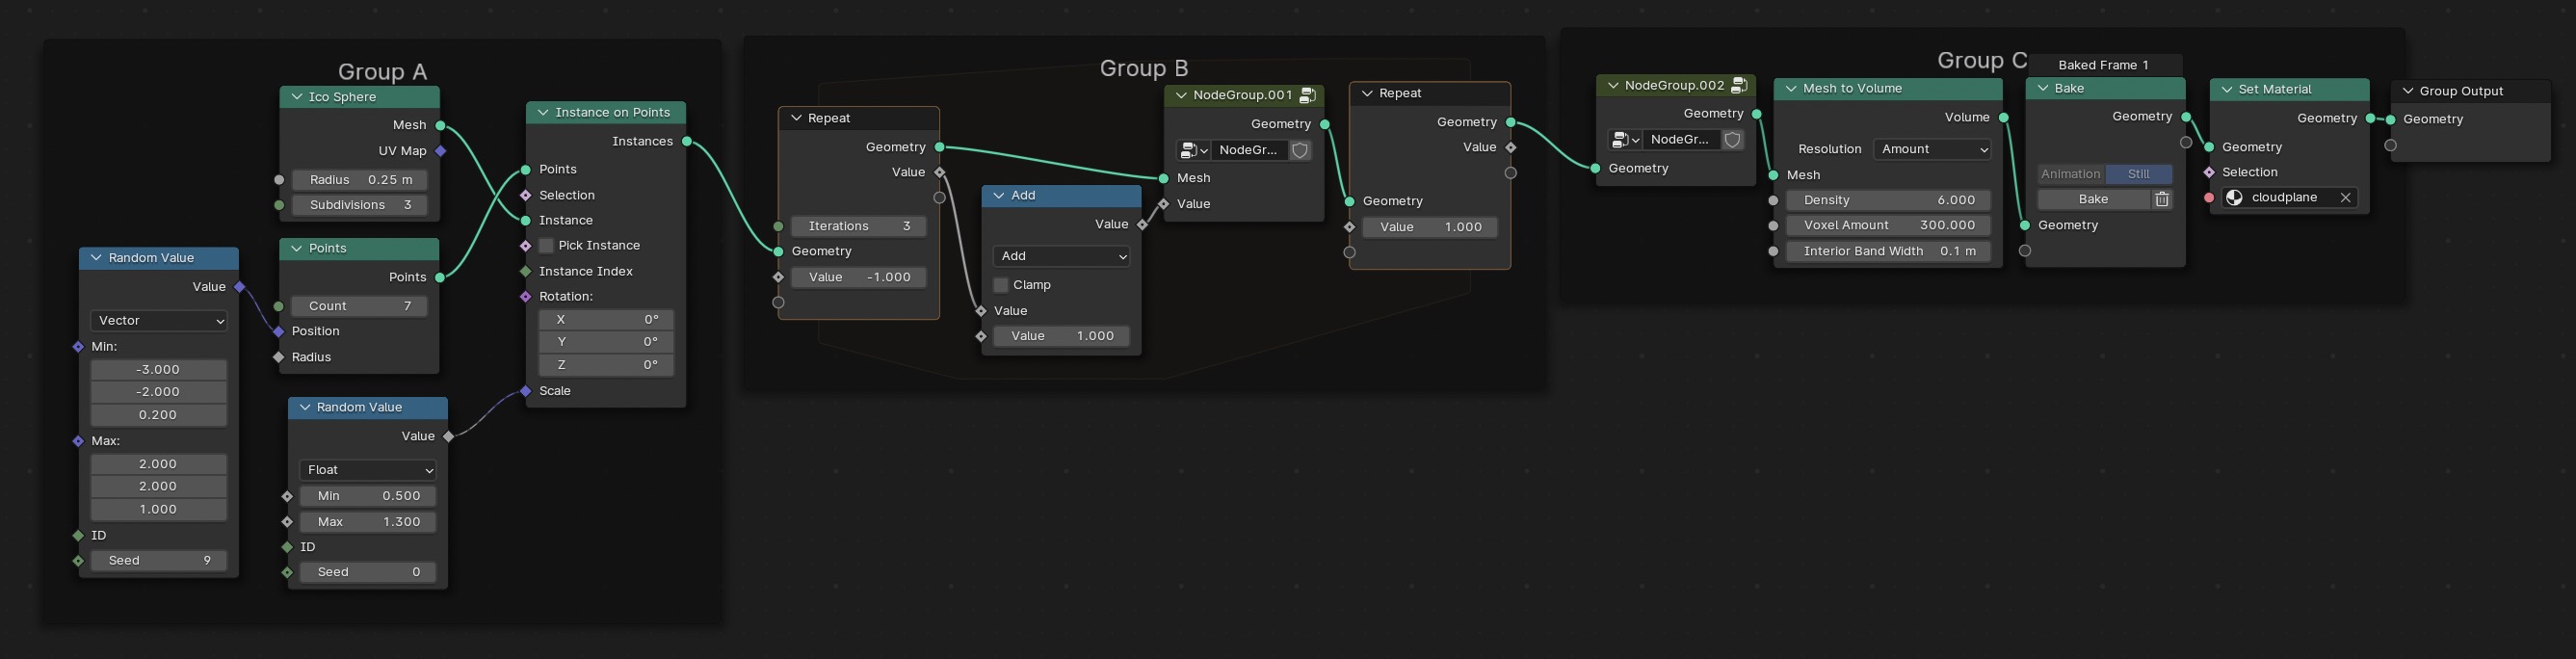
Geometry Node Group A: Random placement of Group B nodules for detail and realism
Random Value 1
- Dropdown = Vector
- Min = -3.000 ; -2.000 ; 0.200
- Max = 2.000 ; 2.000 ; 1.000
- Seed = 9
- Value output -> Points Position input
Random Value 2
- Dropdown = Float
- Min = 0.500
- Max = 1.300
- Value output -> Instance on Points Scale input
Ico Sphere 1
- Radius = 0.25 m
- Subdivisions = 3
- Mesh output -> Instance on Points Instance input
Points
- Count = 7
- Points output -> Instance on Points Points input
Instance on Points 1
- Instances output -> Repeat Zone (1st node) Geometry input
Geometry Node Group B: Randomized scaling of nodules for basic cloud structure
Repeat Zone (1st node)
- Iterations = 3
- Value = -1.000
- Geometry output ->Distribute Points on Faces Mesh input
- Geometry output -> Join Geometry upper input
- Value output -> Math 1 upper Value input
Math 1
- Dropdown = Add
- Value 2 = 1.000
- value output -> Math 2 Exponent input
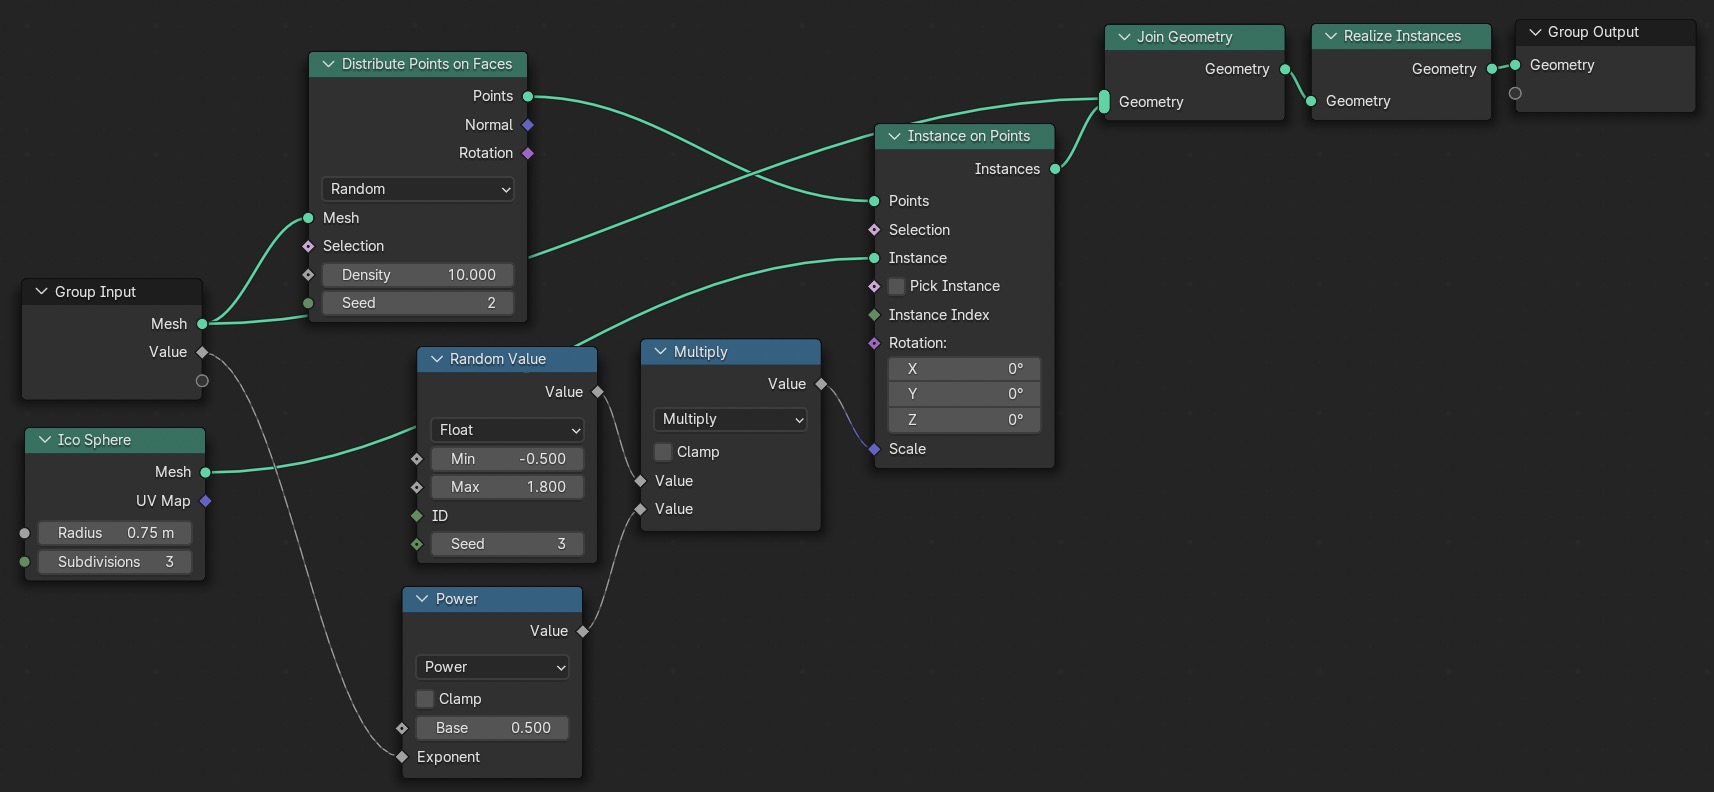
Geometry Node Group B: Nodegroup.001 (basic nodules)
Math 2
- Dropdown = Power
- Base = 0.500
- Value output -> Math 3 lower Value input
Random Value 3
- Dropdown = Float
- Min = -0.500
- Max = 1.800
- Seed = 3
- Value output -> Math 3 upper Value input
Math 3
- Dropdown = Multiply
- Value output -> Instances on Points 2 Scale input
Ico Sphere 2
- Points = 0.75 m
- Subdivisions = 3
- Mesh output -> Instances on Points 2 Instance input
Distribute Points on Faces
- Density = 10
- Seed = 2
- Points output -> Instances on Points 2 Points input
Instances on Points 2
- Instances output -> Join Geometry lower input
Join Geometry
- Output -> Realize Instances input
Realize Instances
- Geometry output -> Repeat Zone (2nd node) Geometry input
Select Math 2 and 3, Random Value 3, Ico Sphere 2, Distribute Points, Instances on Points 2, Join Geometry, and Realize Instances
Right click -> Make Group
(to exit group, go to upper right corner of the viewport and click the L-shaped arrow pointing up)
(to enter group, click the green node's upper right corner on the slider icon)
Repeat Zone (2nd node)
Geometry output -> Bounding Box Geometry input
Geometry output -> Set Position Geometry input
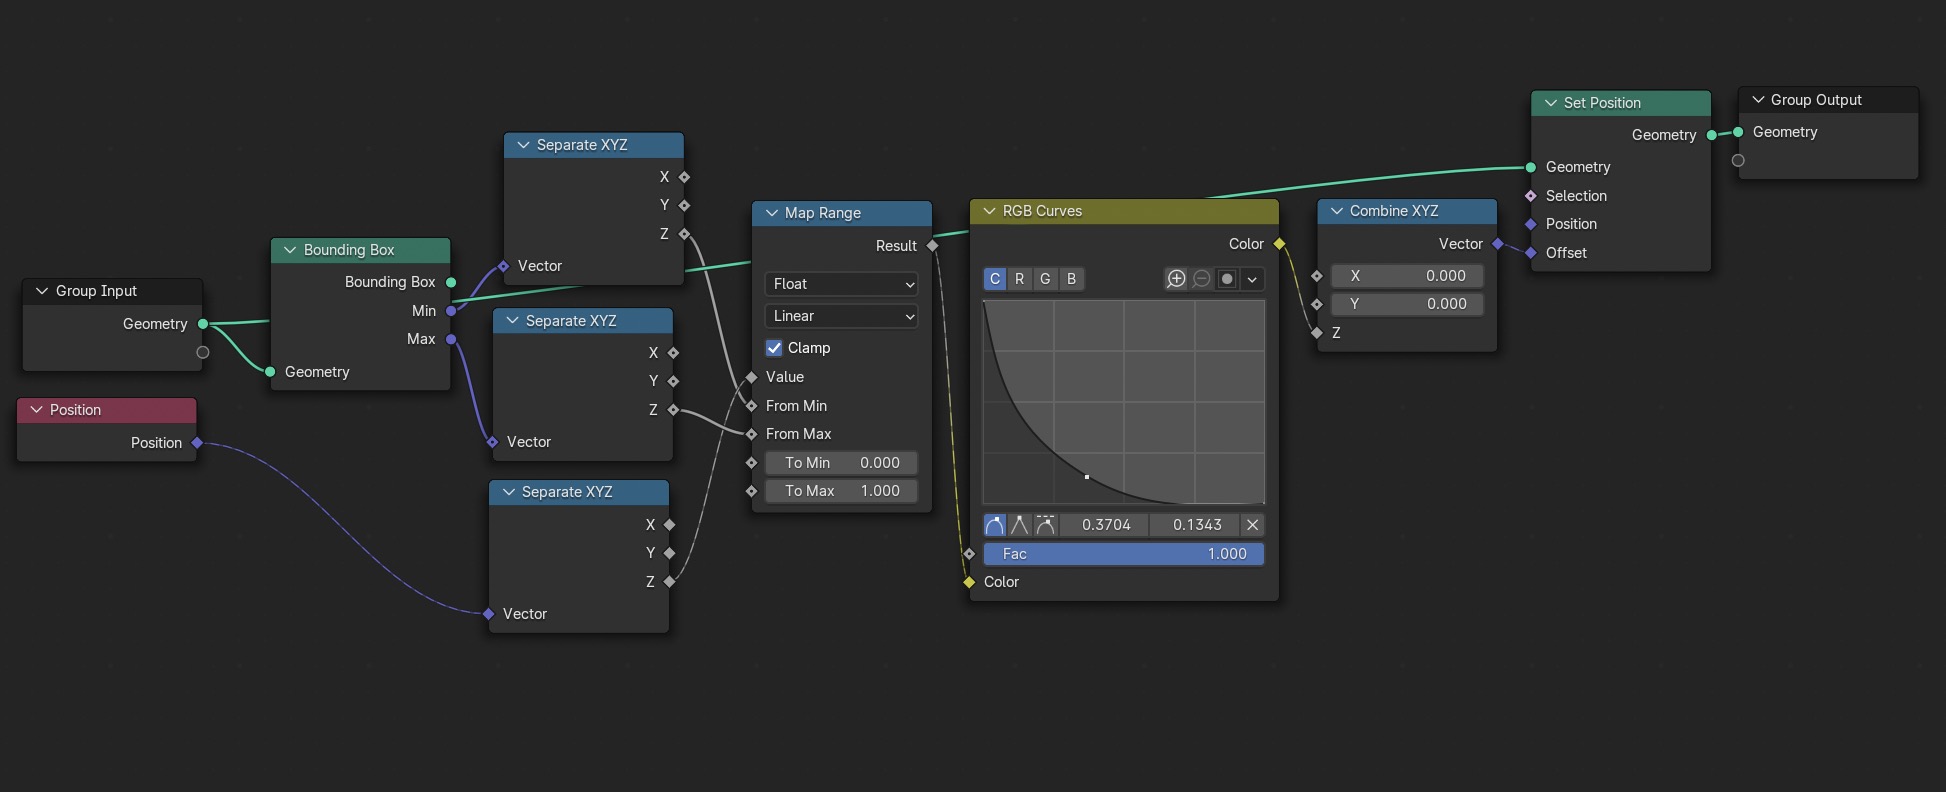
Geometry Node Group C: Nodegroup.002 (flat-bottomed clouds, optional)
(If flat-bottoms clouds are not desirable, skip this group and plug Repeat Zone [2nd node] into Mesh to Volume Mesh input)
Bounding Box
- Min output -> Separate XYZ 1 input
- Max output -> Separate XYZ 2 input
Position
- output -> Separate XYZ 3 input
Separate XYZ 1
- Z output -> Map Range From Min input
Separate XYZ 2
- Z output -> Map Range From Max input
Separate XYZ 3
- Z output -> Map Range Value input
Map Range
- Dropdown 1 = Float
- Dropdown 2 = Linear
- To min = 0.000
- To max = 1.000
- Result output -> RGB Curves Color input
RGB Curves
- Drag left point to the top of the grid
- Drag the right point to the bottom of the grid
- Add a middle point and made a concave curve with a steep initial dropoff
- Color output -> Combine XYZ Z input
Set Position
- output -> Mesh to Volume Mesh input
Select Bounding Box, Position, all Separate XYZs, Map Range, RGB Curves, and Set Position
Right click -> Make Group
Geometry Node Cloud C: Turn the cloud's mesh into a volume
Mesh to Volume
- Density = 6.000
- Voxel Amount = 300
- Interior Band Width = 0.1 m
- Volume output -> Bake Geometry input
Bake
- Select animation or still -> click Bake
- (This saves the calculations in memory to save on rendering time, and cuts risk of crashing Blender)
- output -> Set Material Geometry input
Set Material
- Material = cloud material
- output -> Group Output
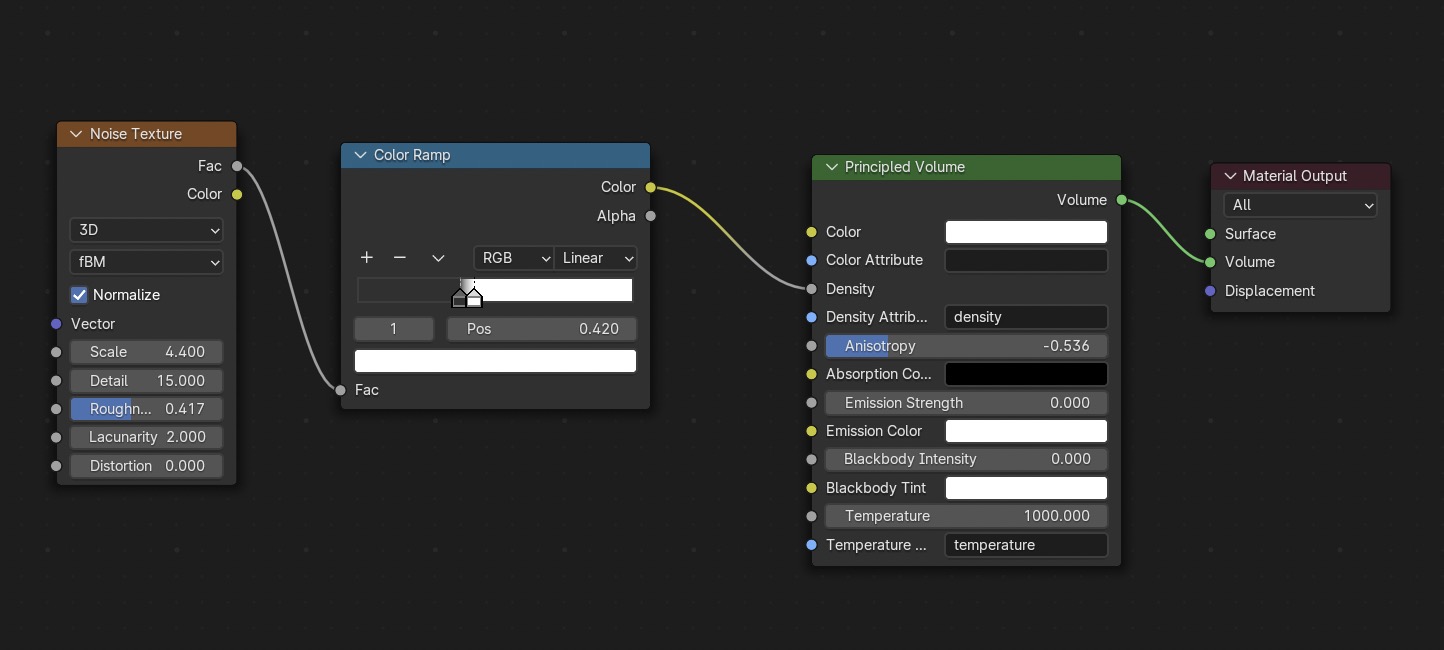
Cloud Material (for color, density, more details)
Editor Type dropdown -> change from Geometry Node Editor -> Shader Editor
Select cloud material
Shift+A
- Shader -> Principled Volume
- Converter -> Color Ramp
- Texture -> Noise Texture
Noise Texture
- Scale = 4.400
- Detail = 15.000
- Roughness = .417
- Factor output -> Color Ramp input
Color Ramp
- Drag black to less than halfway
- Change black to a dark gray
- Drag white to beside dark gray
- Color output -> Principled Volume Density input
Principled Volume
- Tweak to match scene
- Output -> Material Output Volume input


previous page
|